
Creating a Reversible Tote
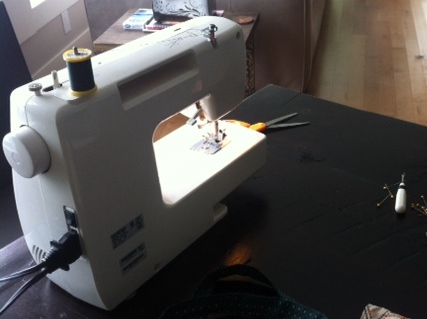
Materials Required
This project requires fabric, sewing machine, iron, scissors, pins and thread.

Step 1
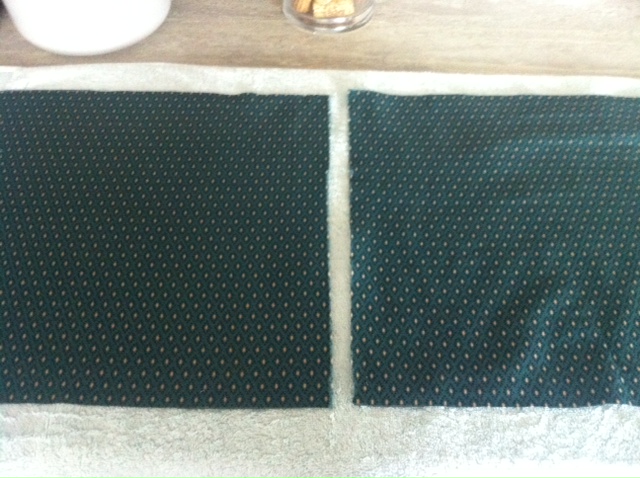
Pre-wash and dry fabric. I chose 100% cotton for this project. I selected colors and patterns that would not only look nice together but also provide contrast between the outer side and the lining of the tote.

Step 2
Iron the fabric to prepare for cutting out pieces using pattern.

Step 3
Using pattern, cut out two 4″ x 22″ pieces. Fold in half and press.

Step 4
Open each piece and fold outer edge to the centre.

Step 5
Then, fold in half and press.

Step 6
Next, top stitch each strap.

Step 7
Step 7 Continued

Step 7 Continued
Using pattern, cut two pieces (13 1/2″ X 14) for tote outside and two pieces (13 1/2″ X 14″) for tote lining.

Step 8

Step 8 Continued
Pin and sew outer pieces right sides together on three sides. Do the same for the two lining pieces.

Step 9

Step 9 Continued

Step 9 Continued
Pinch bottom corner together and stitch across 1 1/2″ from corner for two outer and two lining corners.

Step 10
Place lining inside the outer fabric right sides together. Place straps in between right sides of fabric on each side about 2 1/2″ from the side edge. Pins straps and top edge of tote. Stitch around top of tote 1/2″ edge. Leave a 2 1/2″ opening on the side for flipping tote right side out.

Step 11
Flip bag right side out.

Step 12

Step 12 Continued
Push lining inside tote and top stitch all the way around the top of tote closing the opening left from flipping tote right side out.
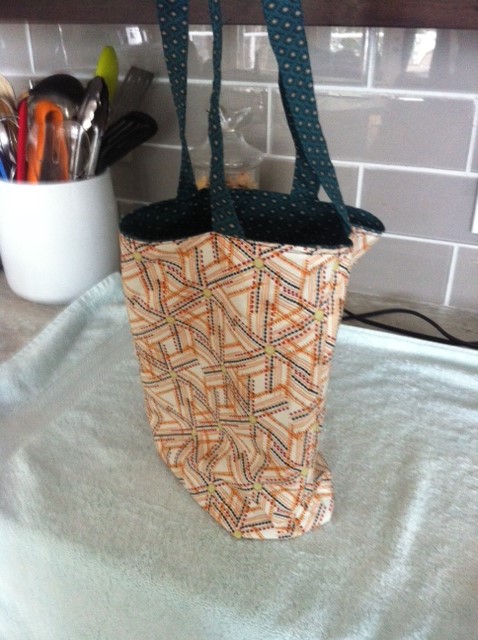
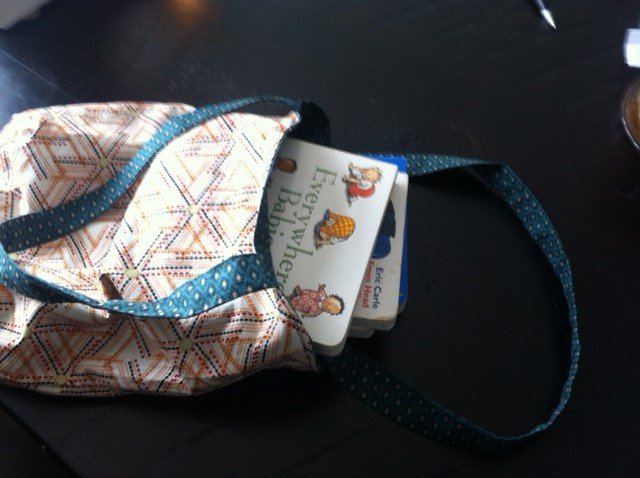
Finished Product
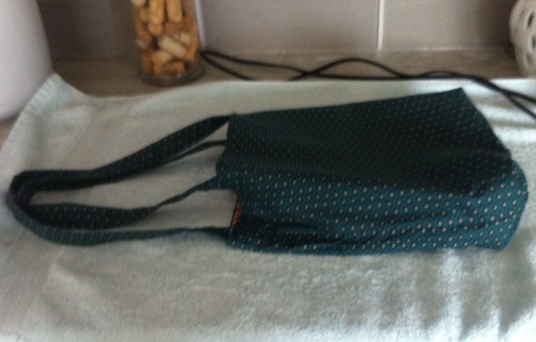
Reversible Tote Results
Reversible Tote Results Continued

Reversible Tote Results Continued
Reversible Tote Results Continued

Reversible Tote Results Continued
Note: I chose to not explicitly embellish this tote as it is for casual and practical use. It will be exposed to hard wear carting things around so I wanted it durable and without too many bells and whistles.
Sources for Instruction on Basic Sewing
“Tilly and the Buttons Dress Handmade: Learn to Sew” (http://www.tillyandthebuttons.com/p/learn-to-sew.html)
Sewing Handout (http://www.lovesewing.com/studenthandouts/isstudenthandouts.pdf)
Sewing Machine Parts and their Jobs Handout (http://misspedeliskifacs.weebly.com/uploads/1/2/1/4/12143109/sewing_machine_parts_and_jobs.pdf)
“Threads: Understanding Thread Tension” (http://www.threadsmagazine.com/item/4302/understanding-thread-tension)
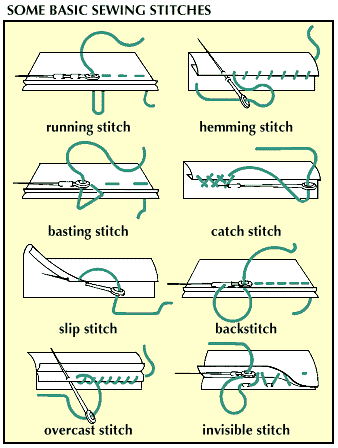
Some Basic Sewing Stitches
http://www.sewdresses.com/sew-dresses/sewing-how-to-sewing-easy-sewing-stitches
“Better Homes and Garden: Sewing Patterns and Tips for Beginners” (http://howtosew.com)
“Simplicity Creative Group: Sewing 101” (http://www.simplicity.com/t-sewing-101-part1.aspx)
“Skip to My Lou: Craft, Create and Celebrate” (http://www.skiptomylou.org/2009/07/17/how-to-make-a-simple-reversible-totebag)
Basic Sewing Class Activity
Textile Arts and Design 7
- Unit 3 in Textile Arts and Design 7 is Textile Production Basics
- General Curriculum Outcome: Students will be expected to develop competency in the selection and use of technological applications in textiles.
- Specific Curriculum Outcome 3.1: Students will be expected to develop skills in the use of technology for sewing, threading and operating a sewing machine, using an iron, using a serger
- Specific Curriculum Outcome 3.2: Students will be expected to apply sewing skills to a project and articulate what they have learned using sewing terminology
Methodology:
- Students will participate in sewing machine activities. They will identify parts of a sewing machine and functions. The following is an example of a handout. Sewing Machine Parts and their Jobs Handout. Students will be expected to thread a machine, sew a straight line, use reverse function, turn a corner, sew a curved line to achieve their “Sewing License.” Students can first practice such skills on piece of paper with template according to task. This is called “Paper Stitching Exercise.” See example.

Paper Stitching Activity
Click to access 3316_see_n_sew_worksheet.pdf
- Students will use smaller sewing equipment such as the following tools: measuring, pinning, pressing, cutting and marking.
- Students will complete a handout on sewing terminology Sewing Handout See n’ Sew Projects (http://www.learningzonexpress.com/documents/worksheets/3316_see_n_sew_worksheet.pdf). Teacher will provide opportunities to practice sewing terminology using handouts and Word Walls.
Resources:
- Nova Scotia Department of Education Curriculum: Textile Arts and Design 7 (Draft)
- http://misspedeliskifacs.weebly.com/uploads/1/2/1/4/12143109/sewing_machine_parts_and_jobs.pdf
- http://www.learningzonexpress.com/documents/worksheets/3316_see_n_sew_worksheet.pdf

Your tote looks great! Have you made it with students? I think it would be easy enough, your images and directions make it seem that way! I am happy to say that the blogs are providing me with some good ideas for new sewing projects with my students. Thanks..
Hi Jyl,
No I haven’t done with students but I think it would be doable.
Thank you for checking out my blog.
Your photo essay and instructions are wonderful. An excellent resource for you and other teachers to refer to over and over again! Congratulations. Impressive work! And the resource list is likewise going to be very useful!
Jodi I really enjoyed your sewing project. I guess I’ve always loved bags, boxes and baskets. My younger sister regularly makes evening bags to grocery bags but I haven’t done it yet. I particularly love the reversible bag- even if it is never flipped, just to see the inside as a complement or a contrast and knowing that you could flip it if you wanted. I also love the solidity of the bag with the lining. You are very good in the blog medium. Very interesting and well done.